

With Frontitude's multi-language support, your team can build a design-driven, continuous localization process, while translators can have the full design context. Here's how you can make it work:
First, finalize copy in the source language
In order to make copy available for translation, make sure that the copy in the source language is finalized and unique keys are assigned:
In Frontitude’s web app
- Open the project you want to share with your translators.
- At the top-center of the page, click the List view icon to get a list of all your project’s texts.
- Each of your project's texts is marked in a color based on its status. To mark copy as final, you can either:
a. Click the relevant card and set the status from the top of the editing panel.
b. Hover a card in the list and click the checkbox at the top-left corner to select a few. Once selected, you can select the Final status from the top action bar.
In Figma
- In Figma, open Frontitude’s plugin.
- Open the plugin’s Edit tab.
- Select the relevant elements (texts, groups, or frames) which include texts that you’d like to send for translation.
- Now, all the copy from the selected elements will be listed in the Edit tab, and each one will be marked in a color based on its status. Select the Final status from the menu at the bottom of the Edit tab. This will mark all selected texts as final.
Set translation keys
By setting human-readable keys (translation keys), developers can refer to multilingual strings in their code. You can set them easily with Frontitude:
In Figma
- Open Frontitude’s plugin in Figma.
- Select the copy you want to assign a unique key to (make sure it is uploaded to Frontitude).
- Open the plugin’s Edit tab.
- Click + Assign a unique key.
- Enter a unique key and click Set key.
In Frontitude’s web app
- Open Frontitude’s web app.
- Open the relevant project.
- Choose the copy you want to assign keys to.
- The Editing panel will open on the right. Click on Assign a unique key.
- Enter a unique key and click Set key.
Configure target languages from your workspace settings
To get started with the translation process, you need to add the target languages to your workspace.
To add a target language to your workspace, do the following:
- Go to your account setting.
- Open the Localization section.
- In the drop-down menu pick your targeted languages and click Add.
To remove a target language from your workspace, do the following:
- Go to your account setting.
- Open the Localization section.
- In the list of target languages, hover over the language you want to remove and a trash can icon 🗑 will appear, click on it to remove the language from your workspace.
💡 Removing language from your workspace will delete all the associated translations. This operation cannot be recovered. Contact us for any data migration-related questions.
Invite translators your project
To allow translators to submit translations, you first have to add them as workspace or project collaborators. Read more If you want to understand better Frontitude’s Roles and permissions.
💡 Under the Team plan, collaborators are included in your billing only after they accept your invitation.
As workspace-level collaborators
To invite a workspace collaborator, do the following:
- Go to your account settings.
- In the Account section, click on + Invite to workspace, enter the email address of the person you want to invite, and click Send Invitation.
- After the invitation was sent, you can click Copy link in the Pending invitation, to send the invitation link in any way you like (for example via email or Slack).
As project-level collaborators
Sharing specific projects with translators will help you give explicit access to only the content they should use, nothing else!
To share specific projects with translators, do the following:
- Open the relevant project for translation in Frontitude.
- At the top bar, click Share.
- A dialogue box will open, click Invite project collaborators in the right-bottom corner.
- Enter the email address of the person you want to invite, and then click Send invitation.

Submit translations in the target languages
Using Frontitude's web app, translators can submit translations with in-context editing experience outside of the design tool.
💡 To allow translators to work with the design in “Design View”, make sure the Include designs option is turned on when uploading content from the design tool to Frontitude. Learn more about uploading content to Frontitude.
To submit translations, do the following:
- Open the project you want to translate in Frontitude’s web app.
- Click on the languages dropdown in the top bar and choose the language you want to translate to from the menu.
- Make sure that you are in Design View using the view mode switch button at the top-center part of the screen, to write with the full design context.
- Find and click on the text element you want to translate.
- The editing panel will open on the right with two text boxes. The upper box shows the text in the source language, and the box below allows you to edit and submit the translation in the target language.
- Once you’re happy with the translation click Submit change and move on to the next text.
💡 For translators to be able to begin the translation process, the copy in the source language must be labeled as Final. Once the copy in the source language is labeled as Final, translators will see it as Ready for translation.
Use status labels to indicate the translation progress
The entire team can track the translation progress of each copy using Frontitude’s status labels. Status labels include:
⚪️ New: New text that has been uploaded to Frontitude and has not yet been edited.
🟡 Draft: The translator is working on the copy and hasn’t finalized it yet.
🟠 Review: Translator gave the translation for review and is waiting for feedback/approval.
🟢 Final: The translation has been approved and is now ready for the dev hand-off.
To add status labels to your copy, do the following:
- Select the copy you want to add a status label to.
- The editing panel will open on the right.
- On the right corner of the editing box, click the status dropdown and choose the status that indicates the actual translation progress.
Track the translation progress
As a manager, Frontitude allows you to track the translation progress and view copy that is still pending for translation, pending for review, or finalized.
Here’s how to do it:
- Open the project you want to track.
- Click on the languages dropdown in the top bar and choose the language you wish to track the translation process.
- At the top of the page choose the List view icon to get the list of all the texts in the project.
- On the left side of the filter bar, use the Translation Status filter to track the translation progress:
- All - Returns a list of all the copy that is ready for translation, whether they are finalized or still a work in progress. Technically speaking, it’s all copy that’s marked as Final in the source language.
- Pending - Returns a list of all the copy that their translation is not yet finalized. Technically speaking, it’s all copy that’s marked as Final in the source language and not Final in the target language. Copy with a Final translation but with a newer version in the source language will also be listed under this filter.
- Translated - Returns a list of all the copy that is ready in the current target language. Technically speaking, it’s all copy that’s marked as Final in the source language and Final in the target language.
💡 As of now, translators are regular collaborators, which means they can submit translations in any language, and change the status in the source language. When adding translators to a project, make sure you set boundaries as to who can edit what.
Review the translation process
Once translations are ready for review, managers (localization manager, project manager, etc.) can start the review process without waiting for the entire project to be translated.
To open the copy that's waiting for review, do the following:
- Open the project you want to review.
- At the top of the page choose the List view icon to get the list of all the copy.
- On the top you have a filter bar, click on Filter by status and choose Review.
- All translations awaiting review are now listed. Click on the copy you want to review.
- The editing panel will open on the right, where you can add edit suggestions, add comments, and tag the translator.
- Once you are happy with the translation, you can mark it as Final using the status dropdown at the top right corner of the editing box.
Handle source language changes for translated copy
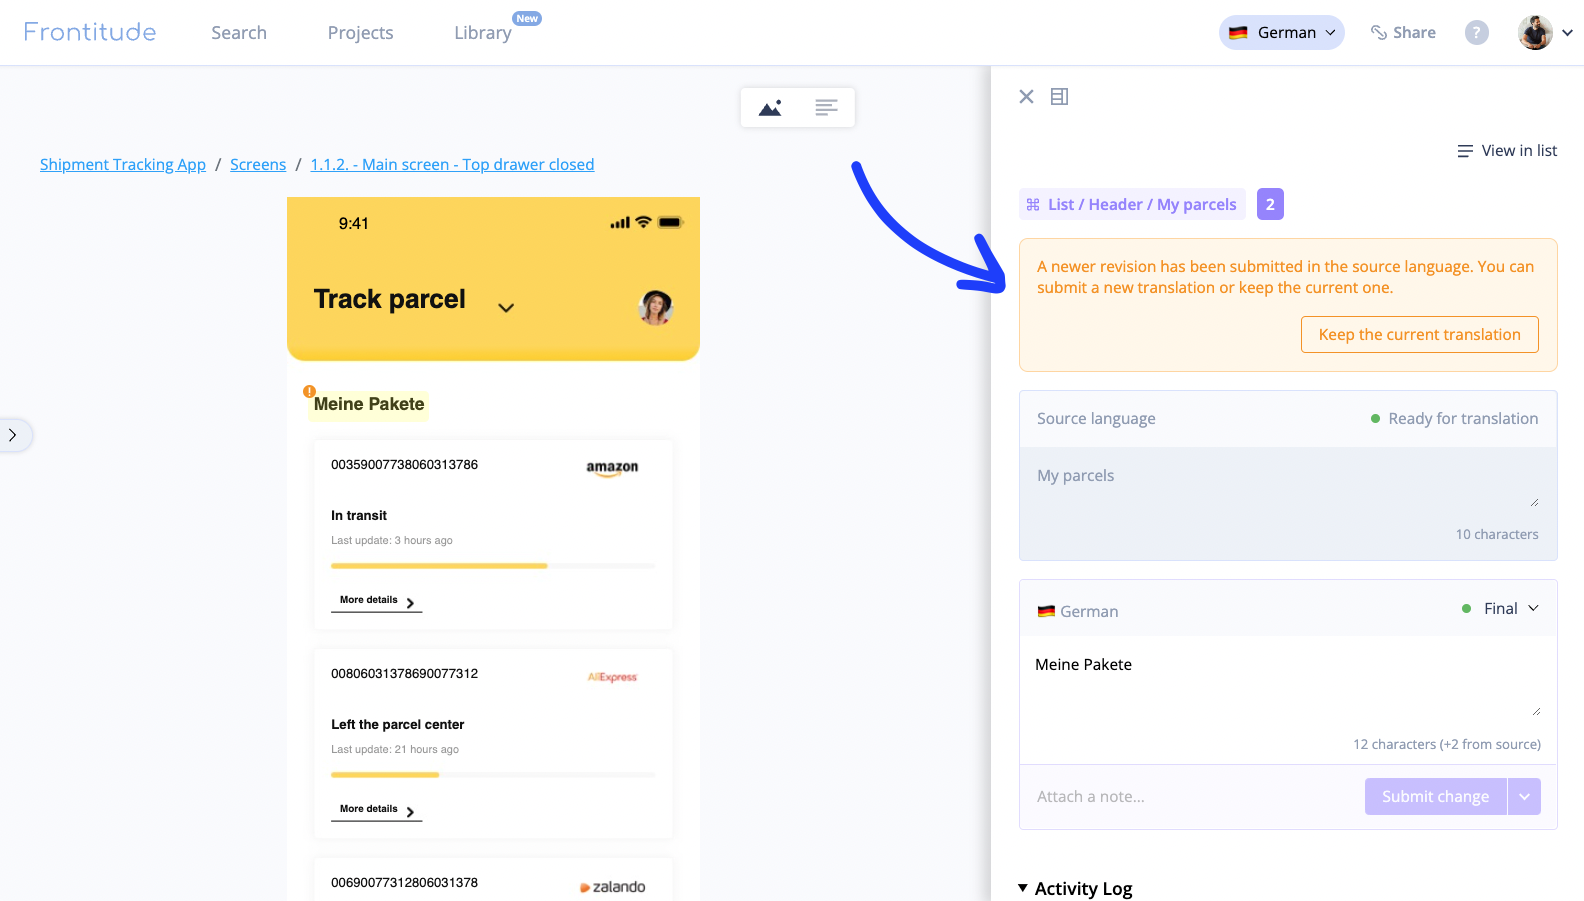
In case a translation has been finalized, but the copy in the source language has been changed, a warning message will appear in the editing panel. This will inform the translator that the source language has been altered.
The translator should edit the translation accordingly and mark the copy as Final, or click Keep the current translation to keep the translation unchanged.
Such translations will be listed under the Pending filter, even though their translation is marked as Final.
Finalize the translated copy for the developer handoff
Once all the translations are ready, you’ll have to finalize them before they can be handed off to developers using Frontitude:
- Open the project you want to share with your translators.
- At the top of the page choose the List view icon to get the list of all your project’s texts.
- Hover any card of copy to reveal the select checkbox. Use this checkbox to select cards that you’d like to finalize. Once you have selected all of the desired copy, click on the status dropdown at the top action bar and select Final.
- Before you hand it off to developers, make sure to assign copy with unique keys.
Handoff translations to developers
💡 Frontitude’s developer tools (API, CLI, codebase integrations, and more) are coming soon to allow developers to fetch the latest translations from their favorite environment, and automate the hand-off process. Contact us if you want to get more details.
Once each copy is assigned with keys and is labeled as Final, you can export the projects as JSON or CSV formats for an easy developer hand-off. To export your files, do the following:
- Open the project with the copy you want to export.
- At the top-center of the page, click the List view icon.
- On the top-right side of the page, click Export.
- The export dialogue will open, choose one of the following formats:
* JSON (Export project content as JSON) - A key/value format that is used by developers.
* CSV (Export project content as CSV) - A tabular, flexible format that is used for various use cases. - (Only in source language mode) Before you export translations, make sure to check the following boxes:
* Include translation: To export all existing translations (Including final and in progress translations). Once you checked this box, another checkbox will appear:
* Only final translations: To export only completed (final) translations.

